Op-Amp Tester
I fried an op-amp the other day, but couldn’t prove it immediately. All I knew was that it wasn’t working in the circuit, but I didn’t know if the chip was dead or if it was just one of those picky chips that demands special care. So, I rigged up a simple go/no-go DIP-8 dual op-amp tester: plug the chip in, apply power, and see if the LEDs light up.
The schematic (single channel):

|
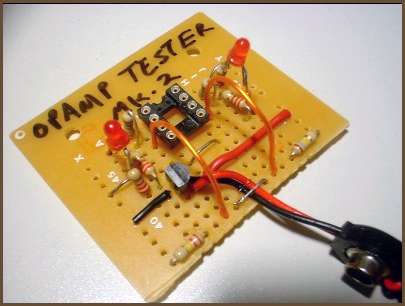
The finished dual channel tester:
|
The circuit will work with any op-amp. Fortunately, there are just a few standard pinouts, and the circuit is cheap, so you can build just a few versions and cover almost every possibility:
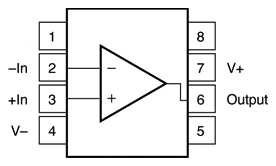
Single-channel op-amp pinout |

Dual-channel op-amp pinout |
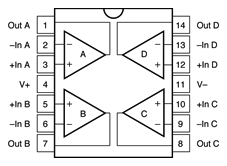
Quad-channel op-amp pinout |
The unlabeled pins on the single-channel pinout are used for various purposes on different chips. You should leave these pins disconnected when building a single-channel version of this circuit.
Theory of Operation
This is a very simple circuit. Since most op-amps work best off of a dual supply, we split the single supply voltage in two equal halves with a TLE2426 “rail splitter.” We want to give the op-amps we test the greatest possible chance to pass our test. If the test fails, there should be no question that it’s because the op-amp is dead; if the user begins to doubt the testing circuit, there’s little point in having the circuit in the first place. The TLE2426 also ensures that the power supply doesn’t get unbalanced, which can throw the results off badly. I did try a simple resistor-divider power supply, and it did get unbalanced easily, even with working chips. You could rig another type of virtual-ground power supply, if you don’t like or can’t get the TLE2426.
R1 and R2 form an 0.55× voltage divider. Subtract 0.5× the supply voltage and you get a reference voltage of +0.05× (1/20) the supply voltage relative to virtual ground going into the op-amp’s +IN. With a fresh 9V battery (~9.5V), you get 0.475V out of the divider relative to virtual ground. We divide the voltage down this far because one of the things we want to test about the op-amp is its ability to amplify the input voltage. Since the op-amp is configured for a gain of 7.8, the output can be as high as about 3.7V.
The analysis so far assumes the op-amp is ideal. The load on the op-amp with a fresh 9V battery and a 1.8V LED is about 9mA, and the highest output voltage can be within about 0.5V of V+. Not all op-amps can drive such a load without the output voltage sagging, and others can’t swing that close to the V+ rail, so you might need a fresh battery — or more than 9V! — to get the LEDs to light up with some op-amps.
The low-voltage limit on this circuit depends on your op-amp and battery configuration. Assuming an ideal op-amp, you get 1mA through the LED with about a 5.2V supply. That gives a decent amount of LED brightness with your average red LED. Many op-amps can’t run on such a low voltage, and a 9V battery is pretty much dead by that point, so there isn’t any point in talking about lower voltages.
It’s about as simple as you could want. The circuit supplies a low input voltage to each of the op-amp’s channels, tries to use the op-amp to amplify it, and if the chip is working properly, the LED(s) will light up.
I have tested this circuit on four known-dead dual op-amps, and three fail to light up either LED, and the other causes one LED to flash intermittently and the other LED fails to come on. Known-good op-amp chips have lit both LEDs in all my tests so far.